| ||||||||
| Spy |
|---|
 Units |
| Requirements |
| Espionage (Science), Hideout Level 1 |
| Cost |
| 150 |
General information[]
As soon as you build a Hideout you can train spies. For each expansion stage you can train an additional spy.
To deploy a spy, click the town on the Island Map in which you wish to gather information on. The option to deploy a spy will appear in the floating menu. When you select this, one of your spies will try to infiltrate the town.
When a spy has successfully infiltrated a town, you can assign missions from your Hideout.
The math[]
Add mission risk base to current risk, subtract defending/target town hall level multiplied by 2, subtract the attacking hideout level multiplied by 2, add risk generated by defending spies working in defending/target city multiplied by 5.
If calculated value is between 5 and 95 then this is Total Risk, if it's below 5 then Total Risk is 5%, if it's above 95 then Total Risk is 95%.
The algorithm:


Where is equal to Current Risk (see Risks section below); is equal to the Mission Risk Base; is risk generated by the number of spies working in defense in the defending/target city; is equal to the defending/target's hideout level; is equal to the defending/target town level; is equal to the attacking hideout level.


A simplified version of the above algorithm can be used to determine the Calculated Risk of catching or stopping an attacking spy, by making certain useful assumptions:
- All of the spies in the defending/target hideout are working in defense:
- The attacking hideout level is 32 (most large towns have this):
- An attacking player will wait til attacking spy's Current Risk is 0:
- All of the spies in the defending/target hideout are working in defense:


Thus the simplified algorithm for defense:

Risks[]
There are three different kinds of risks calculated in this game.
- Calculated Risk
- This is the intermediate risk after performing the calculations in the formula above. This number can have a wide range of values from -255% up to 255%. There currently is a bug where if calculated risk is above 255%, the total risk shows 0% with a full bar. This is instant death for the spy.
- Current Risk
- This is the risk associated after a successful Spy action. This is usually the number seen on the bar that slowly decreases. There is actually a number behind the scene that counts down past 5% total risk seen on the bar. This value is always between 0% and 95%
- Total Risk
- This is the risk seen when you look at the spy. No matter what this risk % is, your spy can not be caught. Only by performing actions can a spy be caught. This ranges from 5% to 95%.
Risk Levels[]
 | This article may need to be updated! Please update this article to reflect newly available information. It now contains information about Patch 0.4.0 and needs to be updated to Patch 9.0.0. You may want to check the Test server GF for any new updates as well. |
The information in this section may be out of date after the last update: The risk bases might have changed.
- Risk 1 Base
- 5% - Infiltrate Town
- Risk 2 Base
- 24% - Spy out treasure chamber
- Risk 3 Base
- 30% - Inspect Warehouse, Recall Spy
- Risk 4 Base
- 40% - Spy out level of research
- Risk 5 Base
- 50% - Online status
- Risk 6 Base
- 70% - Spy out garrison
- Risk 7 Base
- 80% - Observe fleet and troop movements
- Risk 8 Base
- 90% - Observe communication
Example[]
The algorithm:
- Current risk: None

- Mission: Spy out garrison

- Enemy Spies: One spy in defense

- Level of target town's Hideout: Level 1

- Level of target town: Town hall Level 6

- Level of your Hideout:


- The risk for the mission is then:

Current risk is increased every time a spy performs an espionage mission; but it cannot be greater than 95%. Current risk drops gradually until it reaches 0% (5% total risk still visible).
If current risk is high, it can make even easy missions (like checking online status) hard to perform; so it is advisable to wait a certain amount of time until current risk drops to a lower level.
Town Spy Defense[]
| This article may need to be updated! Please update this article to reflect newly available information. It now contains information about Patch 0.4.0 and needs to be updated to Patch 9.0.0. You may want to check the Test server GF for any new updates as well. |
The math formula and information in this section are now out of date.
Remember the previous simplified algorithm:
For Spy Infiltration:

With this information we can calculate what level of hideout you need to prevent spies from infiltrating your town or how much protection you are getting from your current level of hideout. The following table uses the formula above with its assumptions that the attacking hideout is level 32 and all of the spies in your defensive hideout are working in defense. It visually shows you what the percentage chance of catching a spy is, for a given defending town level and its hideout level.
The column at far left shows in ascending order the level of the defensive hideout. The remaining columns represent the defending town's level, . The numbers in the middle of the table represent the percentage Risk for catching a spy that is attempting to infiltrate.
To determine the level of hideout you need, trace over to the current level of your town. Then trace down that column until you reach your desired percentage chance of stopping the spy. Trace over to the left on the same row until you reach the far left column, and this number will be your required defensive hideout level, assuming all of its spies are working in defense.
For example, if you have a level 6 town, and you want to stop a spy from infiltrating at least 75% of the time, you need go to the column at the top that says, . Then scroll down that column until you reach a number that is 75 or higher. In this case it is . Then trace over to the left on the same row until you reach the far left column, and you will see that you need a hideout level of .


To determine your current % protection from infiltration, with one finger find your town level, , at the top, and trace down that column. With the other finger find the row with your current hideout level at the left, and trace across to the right until both fingers meet. The box, where your two fingers meet, will show you what your current % protection from infiltration is.
Additional Notes:
To determine your level of protection if some of your spies are not working in defense (i.e. spying on other people), then simply subtract 2% for every spy on a mission from the number in the box.
The two exceptions to this rule are when the number in the box is 5 or 95. If it is 5, it will always remain at 5. If it is 95, then you can use the formula below:

Where is the number of spies who are not working in defense (i.e. spying on other people).

↓ |
||||||||||||||||||||
|---|---|---|---|---|---|---|---|---|---|---|---|---|---|---|---|---|---|---|---|---|
| 3 | 4 | 5 | 6 | 7 | 8 | 9 | 10 | 11 | 12 | 13 | 14 | 15 | ||||||||
| 10 | 5 | 5 | 5 | 5 | 5 | 5 | 5 | 5 | 5 | 5 | 5 | 5 | 5 | |||||||
| 11 | 12 | 10 | 8 | 6 | 5 | 5 | 5 | 5 | 5 | 5 | 5 | 5 | 5 | |||||||
| 12 | 19 | 17 | 15 | 13 | 11 | 9 | 7 | 5 | 5 | 5 | 5 | 5 | 5 | |||||||
| 13 | 26 | 24 | 22 | 20 | 18 | 16 | 14 | 12 | 10 | 8 | 6 | 5 | 5 | |||||||
| 14 | 33 | 31 | 29 | 27 | 25 | 23 | 21 | 19 | 17 | 15 | 13 | 11 | 9 | |||||||
| 15 | 40 | 38 | 36 | 34 | 32 | 30 | 28 | 26 | 24 | 22 | 20 | 18 | 16 | |||||||
| 16 | 47 | 45 | 43 | 41 | 39 | 37 | 35 | 33 | 31 | 29 | 27 | 25 | 23 | |||||||
| 17 | 54 | 52 | 50 | 48 | 46 | 44 | 42 | 40 | 38 | 36 | 34 | 32 | 30 | |||||||
| 18 | 61 | 59 | 57 | 55 | 53 | 51 | 49 | 47 | 45 | 43 | 41 | 39 | 37 | |||||||
| 19 | 68 | 66 | 64 | 62 | 60 | 58 | 56 | 54 | 52 | 50 | 48 | 46 | 44 | |||||||
| 20 | 75 | 73 | 71 | 69 | 67 | 65 | 63 | 61 | 59 | 57 | 55 | 53 | 51 | |||||||
| 21 | 82 | 80 | 78 | 76 | 74 | 72 | 70 | 68 | 66 | 64 | 62 | 60 | 58 | |||||||
| 22 | 89 | 87 | 85 | 83 | 81 | 79 | 77 | 75 | 73 | 71 | 69 | 67 | 65 | |||||||
| 23 | 95 | 94 | 92 | 90 | 88 | 86 | 84 | 82 | 80 | 78 | 76 | 74 | 72 | |||||||
| 24 | 95 | 95 | 95 | 95 | 95 | 93 | 91 | 89 | 87 | 85 | 83 | 81 | 79 | |||||||
| 25 | 95 | 95 | 95 | 95 | 95 | 95 | 95 | 95 | 94 | 92 | 90 | 88 | 86 | |||||||
| 26 | 95 | 95 | 95 | 95 | 95 | 95 | 95 | 95 | 95 | 95 | 95 | 95 | 93 | |||||||
| 27 | 95 | 95 | 95 | 95 | 95 | 95 | 95 | 95 | 95 | 95 | 95 | 95 | 95 | |||||||
| 28 | 95 | 95 | 95 | 95 | 95 | 95 | 95 | 95 | 95 | 95 | 95 | 95 | 95 | |||||||
| 29 | 95 | 95 | 95 | 95 | 95 | 95 | 95 | 95 | 95 | 95 | 95 | 95 | 95 | |||||||
| 30 | 95 | 95 | 95 | 95 | 95 | 95 | 95 | 95 | 95 | 95 | 95 | 95 | 95 | |||||||
| 31 | 95 | 95 | 95 | 95 | 95 | 95 | 95 | 95 | 95 | 95 | 95 | 95 | 95 | |||||||
| 32 | 95 | 95 | 95 | 95 | 95 | 95 | 95 | 95 | 95 | 95 | 95 | 95 | 95 | |||||||


Caught spies[]
Occasionally, spies are being caught due to high level of spy out chance. However, the level of spy out chance will decrease after a certain amount of time and will increase again after another mission.
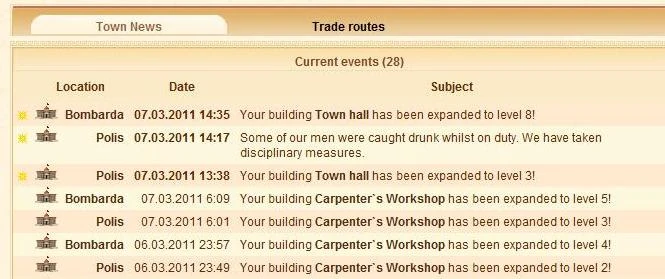
If unfortunate, you may get a report like this:
This means that your spy has been caught and executed , so he won't be able to return to your town. Based on a random chance, he may give a report as shown in the above section, so the player you wanted to spy may be informed of what he was trying to do, how many resources you have in your town, how many workers you have assigned on your island or how many and what units are stationed in your town. There also a chance that they may receive no information other than the spy's capture. You will need to train and deploy a new spy as a replacement.
Some times you may also get a report like this:
- Status: Mission aborted...
- Report: Your spy was discovered, but could flee in time. He is now returning to your home town. You should give him a little rest...
The player you wanted to spy will be informed about your spy that has been caught and maybe the mission he was trying to complete.
- Spy Caught Report
Wine is used, but sometimes... they can get rowdy
Some of our men were caught drunk whilst on duty. We have taken disciplinary measures
Usefulness of some abilities[]
Due to certain mechanics of the game, the player can automatically observe the wealth of another by looking in the high-scores, opposed to risking the chance of a spy being lost and wasting gold ![]() .
.
Spying provides useful information on towns. First you need to research Espionage and build a Hideout, then you can build Spies.
Once you make a spy for 150 ![]() and 80
and 80 ![]() , you can set him to work by clicking on your target city and using the Actions menu on the far left of the screen to "Send Out Spy." You'll see the amount of risk involved to infiltrate the town, and decide if it's worth spying on them.
, you can set him to work by clicking on your target city and using the Actions menu on the far left of the screen to "Send Out Spy." You'll see the amount of risk involved to infiltrate the town, and decide if it's worth spying on them.
Spy Abilities[]
After infiltrating you merely have to click on your Hideout that you trained the spy at, and then you'll see the following image beneath the normal Hideout info:
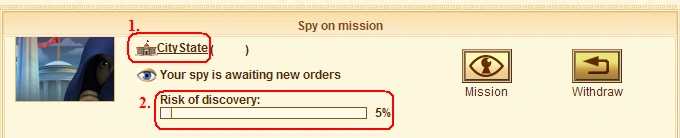
- Denotes which city the spy is currently in as well as the city's coordinates (which have been edited in this screenshot).
The name of the city is a link, by clicking it you are able to view the city which your spy has infiltrated! You will be able to view the buildings and building levels which are in that city. - The Current Risk meter. Each time you perform a mission using your spy without being caught, the Risk Meter goes up. Waiting will reduce the Current Risk, and the Risk Meter will go down again. The lowest the Current Risk can be is 5%, and this is included in the Mission Risk, meaning what you will see is the Mission Risk + Current Risk when viewing the missions' quoted risk.
There exists the chance on every mission that your spy will be detected. When this happens the player catching the spy even has a chance of determining where the spy came from.
The risk of detection is massively increased for a short time after every mission. Wait a while before you assign your spy another mission to reduce the risk of being detected.
Missions[]
Click the "Mission" button to give your spy an order. You will be shown a screen with a list of missions that may be performed and the risk involved of failing, and possibly getting caught.
Risk rating system: Lower the number, lower the risk. Higher the number, higher the risk.
- Level of your Hideout - reduces the chance of being detected by 2% per each level.
- Size of the infiltrated town - reduces the chance of being detected by 2% per each level.
- Number of opposing spies in the infiltrated town - increases chances of being detected by 5% per each spy defending that town.
- Level of Target town's Hideout - increases chances of being detected by 2% per each level.
Spies have the following missions:
| Mission | Risk Base | Mission Description |
|---|---|---|
| Infiltrate Town | Risk Base #1 | You plant a spy in the target town. |
| Spy out treasure chamber | Risk Base #2 | How much gold is in the treasury. (Useless spy mission: This function may be performed by looking up the player in the Highscore list under the "Gold Stock" score.) |
| Recall Spy | Risk Base #3 | Your spy returns to his Hideout. |
| Inspect warehouse | Risk Base #3 | You can find out how many resources the town has. You might know if an attack would pay off. |
| Spy out level of Research | Risk Base #4 | You learn which discoveries were last made. |
| Online status | Risk Base #5 | Finds out if the player is Online. User must be viewing an Ikariam game page at the time the spy performs the mission to determine whether they are "online" or not. |
| Spy out Garrison | Risk Base #6 | How many and what types of soldiers, war machines and war ships are stationed within the town. |
| Observe fleet and troop movements | Risk Base #7 | A fleet's origin and destination, total number of units & cargo ships as well as arrival time. |
| Observe communication | Risk Base #8 | You learn who the victim has messaged within the last few hours. You only see the subject, not the content. |
Spy defense[]
Each spy in its home town automatically defends against any and all espionage against that town. To be exact, each defending spy adds 5% to the risk of infiltrating the town and missions performed in the town.
Also, the level of the Hideout in the town adds 2% per level to the risk of espionage in that town.
The maximum you can increase espionage risk to is 95%. The lowest risk a mission can be is 5%.
Failed spying attempts[]
Spy doesn't answer[]
Your spy has been caught and executed. You will have to train a new one to replace them.
Warning: If this occurs it is possible the spy has revealed information to the target, including who sent the spy, what mission the spy was attempting, or even information about the town the spy was sent from such as resources, gold, and personnel in that town.
Mission aborted[]
If he is caught there is also a possibility he will escape and return to the town in which he was trained, preventing any info from being revealed, effectively getting away, but will have failed the mission.
Spy Report[]
Wine is used, but sometimes... they can get rowdy
Some of our men were caught drunk whilst on duty. We have taken disciplinary measures
Tactics[]
If you want to keep tabs on somebody, starting out by checking if they're on or not using the Online Status mission will let you know if they're paying attention right now. This can be important if you're going to attack somebody, as obviously they can't retaliate or make new troops if they're offline.
Checking their garrison will provide you with the knowledge to decide if you can win a battle, and what to use to fight them. While these tactics are for another guide, attacking with Spearmen against Hoplites is hopeless. Also, checking to see what troops they have will also tell you if they have enough units to fill the front lines slots. If they only have 30 hoplites, for example, you may not need to fill all of the battle slots, since their army will not take much to destroy it after the wall has been breached.
You can see what buildings they have and what level the buildings are by clicking twice on their town in the Island View and hovering over a building to see the level. This can be vital, as knowing what levels their Wall and Warehouse are will let you know how difficult it would be to get past their defenses, and how much of their resources are protected. (Remember, if a player is active, their warehouse(s) protects 6% of its stored goods, but if they are inactive, it only protects 1%.)
Determining the research they've obtained will let you know what troops and ships could prove a challenge.
Observing Troop and Fleet movements will tell you when they have a cargo ship coming in so you can blockade the city beforehand to grab the goods on board. Also, any troops coming back will be sunk, and any enemy ships returning will have to fight you to get past the blockade. This can also tell you who they're attacking and how long those units will be gone.
Observing Communication and looking at the Treasury are the most useless abilities. Observing Communication only tells you the 'subject' - meaning whether or not it was a message or treaty, and who it was with. Not terribly useful. You can also find out how much gold they have by looking at the Highscores and Goldstock score. Neither of these are recommended to use.
Risk[]
The risk involved to infiltrate a town depends on the Hideout level the spy is being sent from, the level of the target town, and how many spies are acting in defense of the target town.
The risk of each mission depends on a fixed percentage for each mission, which is reduced by the Hideout level the spy is being sent from and the level of the target town, but is raised by any spies acting in defense of the target town.
Formula[]
Each level of your Hideout lowers the risk by 2% and each level of the target town lowers the risk by 2%, whereas each spy in the target town raises the risk by 5%. The risk will never be lower than 5% or higher than 95%, however. So there's always a chance to get caught and always a chance to accomplish the mission.
Each mission has a base risk associated with it, which are the following:
- Risk Base #1: 5%: Infiltrate town
- Risk Base #2: 24%: Spy out treasure chamber
- Risk Base #3: 30%: Inspect warehouse & Recall spy
- Risk Base #4: 40%: Spy out level of research
- Risk Base #5: 50%: Online status
- Risk Base #6: 70%: Spy out garrison
- Risk Base #7: 80%: Observe fleet and troop movements
- Risk Base #8: 90%: Observe communication
Algorithm[]
The nuts and bolts:
The risk for a mission is

- is the Current Risk (whenever you perform a mission, infiltrate, or evacuate, your Current Risk goes up).
- is the Mission risk base shown above,
- is the number of enemy spies in the target town,
- is the target town's Hideout level,
- is the target town level,
- is the infiltrating spy's Hideout level.
Other Misc
| ||||||||||||||||||||||||||||||||


